Thursday, April 22, 2010

Wavy Blue Lines

You may be seeing wavy blue lines in your Word documents and wondering, “what’s up?” The answer is, “it depends.” That’s because Microsoft uses a wavy blue line to identify two different document issues. Weird, eh? It’s like a car manufacturer using the same light on the dashboard of your car to mean either the trunk is ajar, or you’re almost out of gas. Both could be trouble, but the latter might be a bit more dire, depending on how far you are from home.

Formatting Consistency Checker

The Formatting Consistency Checker was introduced in Word 2002 and helps you maintain a uniform layout of your document by alerting you when formatting in a document is similar to, but not exactly the same as other locations in the document. Word looks for these potential areas of irregularity:
  • Directly applied formatting
  • Bulleted and numbered lists
  • Directly applied formatting that matches a style
For example if you typed a section heading and manually applied Arial 14pt and Bold, but a style exists in the document with the same attributes, the directly formatted heading would appear with a wavy blue underline. Upon right-clicking the underlined text, an option on the shortcut menu would read, “replace direct formatting with style.”

I’m not a big fan of this feature. Sure, it’s a good thing to format your documents consistently, and in a perfect world, we would all have the time to make sure everything is done “right” under the hood. The bottom line, however, usually comes down to how the document looks on the surface when printed. Additionally, using the Formatting Consistency Checker requires enabling the Keep Track of Formatting option, which has a whole pile of ramifications too numerous to detail here.

If you’d like to play with the Formatting Consistency Checker to see how you like it, follow these steps to enable it:
  1. Click the Office Button and choose Word Options.
  2. Select the Advanced category and, in the Editing options section, select the Keep track of formatting checkbox.
  3. Select the Mark formatting inconsistencies checkbox.
  4. Click OK.
Contextual Spelling

The other cause of wavy blue lines in Word documents is Contextual Spelling, a new function in Office 2007. This is one of my favorite improvements in Office! Just like the familiar red wavy underline that highlights words that are incorrectly spelled, the blue wavy underline highlights words that are incorrectly used. For example, the sentences below are spelled correctly and sound right when you speak them, but the wrong word is being used.


To enable Contextual Spelling:
  1. Click the Office Button and choose Word Options.
  2. Select the Proofing category and, in the When correcting spelling in Microsoft Office programs section, select the Use contextual spelling checkbox.
  3. Click OK.
My favorite Wavy.

Friday, April 16, 2010

Keyboard Shortcut of the Week

Insert a Page Number Field

One of the most common reasons for creating a header or footer in a document is to add page numbering. Word 2007 offers all kinds of fancy page numbering options, but most of the time, all I want is a plain old number. To add one quickly, position the insertion point where the number should appear and press Alt + Shift + P to insert a page number field.

If that’s too easy for you, check this out for a harder page number trick.

Thursday, April 15, 2010

Save a Tree

It seems you can’t swing a chain saw in Oregon without hitting someone urging you to be “green.” And really, why wouldn’t you want to save the planet? I’m pretty sure it’s kind of important to… everyone. It’s just all the nagging that starts to grate on me. If you’re feeling the pressure too, here’s an easy way to use Word to get the eco-nuts off your back.

Print Only What You Need

Current Page
A large contract you prepared yesterday is ready to be signed; however, you notice there’s a problem with the date on the signature page. No need to re-print the entire contract. Word allows you to print just the page your insertion point is on. Begin by placing the insertion point on the page you want to print. Then, open the Print dialog box and select the Current page option in the Print Range section, then click OK.


Certain Pages
If your contract needs to be further modified before signing, you can print just the changed pages. Printing only certain pages is simple, especially if you don’t have multiple sections in your document. (What’s a section?) In fact, there are instructions right on the dialog box! To print pages three through seven, just type 3-7 in the Pages field. To print pages one, five, and nine through 12, type 1,5,9-12.

If your contract has more than one section, you may need to specify both the page and the section to print. If you specify only the page, Word will print that page number (if it exists ) from the first section of the document. To identify which page of which section you want to print, enter criteria in the Pages field like this:

Page five, section three: p5s3
Pages 10-15, section one: p10s1-p15s1

Selection
If you want to see how just a portion of your text looks, you can print only selected text. Begin by identifying what you want to print by selecting it. Then click the Selection radio button in the Print Range section of the Print dialog box. Note: The selected text will print starting at the top of a new sheet of paper, so it’s not the best choice if you want to review your document’s layout or the position of elements on the page.

Use Both Sides of the Paper

Print Duplex
Many printers have a duplexing option that automatically prints on both sides of the paper. To find out if yours does, check the manual (Wha? I know. I crack myself up!) or just click the Properties button on the Print dialog box and look for double-sided or duplex options.

Even if your printer doesn’t support double-sided printing, you can still save paper using Manual Duplex. This process prints all of one side of the pages, then you flip the stack over and print the other side.

To enable it, check the Manual duplex box on the Print dialog box. After the first side of the pages have printed, a prompt will appear to let you know it’s time to flip the pages over and place them back in the printer’s paper tray (see below). When you click OK, the remaining pages will print.


No Duplex? No Problem.
If you don’t see a Manual Duplex option on the Print dialog box, you can fake it by first printing all of the odd pages, turning the pages over, then printing all of the even pages. To print just odd pages, choose Odd from the Print drop-down list. Then, flip the stack over, load the pages into the printer’s paper tray, and then choose Even from the Print drop-down list to print the even pages.

Print Multiple Pages Per Sheet
Another way to save paper is to print multiple pages on one sheet of paper. It’s not the best choice for optimum readability, but I really like the option for taking documents to proofread at home or on the train. To print up to 16 pages on the same sheet of paper, select the number of pages to print from the Pages per sheet drop-down in the Zoom section of the Print dialog box.

If your printer has duplex capability, you can combine duplexing and printing multiple pages per sheet to get a minimum of four pages per sheet of paper! Unfortunately, you can’t use the Manual Duplex option with Multiple Pages Per Sheet.

I hope you’re feeling a bit more self-righteous now that you have another set of tools for reducing your impact on the planet’s resources. Enjoy that smug feeling, you've earned it.  Now I have to go sort the recycling bin.  It's trash pickup day on my street.

Friday, April 9, 2010

Keyboard Shortcut of the Week

Switching Between Open Documents

I usually have three or four Word documents going at the same time. I like to have my Inbox and Calendar in separate windows, and I often have three or more emails open at once. Throw in iTunes and a couple instances of Internet Explorer, and it can be hard to handle. Some people call it scattered, or even ADD, but I call it multi-tasking! Isn’t that what Windows is all about?

I bet you know the Windows keyboard shortcut Alt + Tab to cycle through open windows. It’s a great timesaver, but with a dozen or more windows to deal with, your left hand is bound to cramp up by the time you get to the window you need.

Did you know you can cycle through just your Word documents? Press Ctrl + F6 to move forward through your documents or Ctrl + Shift + F6 to move in the reverse direction.

If you have a favorite keyboard shortcut, email me and I’ll share it with the world (or the five people who read this blog).

Thursday, April 8, 2010

Review of Formatting Marks, a.k.a Nonprinting Characters

A recent Keyboard Shortcut of the Week detailed how to easily toggle Formatting Marks. Now that you can easily see them, what do they mean? Some symbols are easy to figure out. For example, ¶ indicates the end of a paragraph. But some are just plain weird. For example, what could ¬ possibly mean?

Here is a summary of the more common formatting marks you’ll encounter in Word, what they represent, and how understanding them can help you troubleshoot formatting problems.


Space - Depending on the font or justification you’re using, it may be difficult to tell where there are extra spaces in your document. If words seem too far apart or sentences too close together, check for the correct number of dots.


Non-breaking Space (also called Required Space) - Great for preventing dates or names from being split by line breaks.


End of Paragraph - Appears when you press the Enter key. It’s helpful to be able to see end of paragraph marks when lines appear to end before the margin, or don’t wrap as you expect. The absence of this symbol where space exists between paragraphs is an indication of spacing before/after formatting. The End of Paragraph formatting mark holds the formatting for the paragraph, such as tabs, indent, or line spacing. If you want to copy the text of a paragraph including its formatting, select the end of paragraph mark along with the text.


Soft Return or Line Break - Just like the End of Paragraph mark, look for these when lines appear to end before the margin or don’t wrap as you expect. They often show up in your document when pasting from Web pages.


Line and Page Break Formatting Mark.  Appears in the left margin on the first line of any paragraph with the following:
  • Keep with next
  • Keep lines together
  • Page break before
  • Suppress line numbers
If you find large blank spaces in your document, look for this symbol as a clue.
Tip: Double click the symbol to open the Paragraph Format dialog box.


Tab - Helpful to see where tabs are inserted to move text away from the left margin versus where the a left indent is applied.


Image Anchor - Appears to the left of the first line of a paragraph to which a image is anchored. Since anchored image move with the paragraph to which they’re anchored, be careful when moving or deleting a paragraph with this symbol.


Page Break - Indicates a manual or “hard” page break versus one that occurs naturally.


Section Break - Header and footer or other page formatting not consistent? Check for section breaks.


Column Break - Indicates a manual or “hard” column break versus one that would occur naturally.


Conditional Hyphen - Conditional hyphens are automatically added to your document when the Hyphenation feature is set to automatic. This feature is useful if you like to use Full Justification.


End of Cell/Row Marker - Like a paragraph mark, but indicates the end of a table cell or row. Copying the contents of a cell or row that includes the end of cell/row mark, includes the cell’s/row’s formatting.


Hidden Text - A dotted underline indicates hidden text. Because hidden text doesn’t normally print, it can be used to temporarily remove text from a document without deleting it. Some Word fields (Index, Table of Contents and Table of Authorities) have the hidden attribute applied automatically.


Field Codes - Fields codes are instructions that tell Word to display information such as page numbers, dates, hyperlinks and other information in a document. Field codes appear between curly brackets and are made up of the field name, properties or variables, and sometimes switches that are used to customize the field.

Always On
You may find there are certain formatting marks that you always want to see. For example, I use a lot of images in the documents I create. I like to see object anchor all the time to keep from accidentally deleting an image along with a paragraph I no longer want.

To select Formatting Marks to always display:

  1. Click the Office Button and choose Word Options.
  2. Select the Display category and scroll to the Always show these formatting marks on the screen section.
  3. Check the box(es) for the formatting mark(s) you want to see.
  4. Click OK.

Friday, April 2, 2010

Keyboard Shortcut of the Week

Zoom Zoom

I’ve had a terrible cold this week, so I’m dreaming of a keyboard shortcut that pops up a Kleenex, or fires a cough drop out of the CD drive. But, since Word does not have any cold and flu care features, I guess I’m stuck doing those things the old fashioned way. Snif.

You may argue with me that this is not exactly a keyboard shortcut because it involves the mouse, but I use it 100 times a day, so I think it’s worth sharing.

Both Word 2003 and 2007 have a Zoom feature that lets you magnify or shrink the display of your document on screen. Zooming way out is great when you need a bird’s-eye view of the layout of your document. Zooming in really helps to focus on your text and makes proofreading easier. It’s also a lifesaver when you forget your glasses!

More information about using Zoom in Word 2003 and Word 2007.

If you have a mouse with a wheel button, you can use it to zoom in or out on your document by pressing the Ctrl key while you roll the wheel. This works in all document views, including Print Preview.1

At first I had a hard time remembering which way to roll the mouse to zoom in or out. Here’s a trick to help you with this: roll the wheel toward what you want to see closer and away from what you want to see from farther away.

1 Try this in other Microsoft Office programs and Internet Explorer.

Thursday, April 1, 2010

So Happy Together – Part III

Avoiding Awkward Page Breaks with Keep With Next

The concepts in this article apply to both Word 2003 and 2007, however the steps listed are for 2007 only.

This is the third article in a three-part series describing tools to prevent paragraphs from being split poorly across a page break.

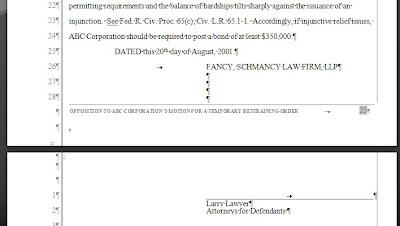
Last week I was mean, and left you hanging without giving you the answer to the problem of signature blocks that are broken across a page break. In the situation pictured below, neither Widow/Orphan control nor Keep Lines Together will prevent the signature block from being split. The best solution is to use Keep With Next.


Unlike Keep Lines Together, Keep With Next does what it sounds like it should. It keeps a paragraph with the one that follows. This works great with headings that should always be kept with the paragraph that follows them and, of course, anytime you want to keep two paragraphs together as in a signature block.

To apply Keep With Next, follow these steps:
  1. Begin by selecting the paragraph(s) you want to prevent from being split from the one(s) that follow.

  2. Next, open the Paragraph dialog box by clicking the dialog box launcher in the Paragraph group in Home ribbon.


  3. If necessary, select the Line and Page Breaks tab.

  4. Then, check the Keep With Next box.

  5. Click OK.
I think of Keep With Next as a chaining feature. By applying it to several paragraphs in a row, you can “chain” them so they are never separated. Just be careful you don’t try to keep more together than can fit on a single page or you’ll experience weirdness.

And remember, just like Widow/Orphan control and Keep Lines Together, Keep with Next doesn’t work in a table. To keep paragraphs in a table together,
disable the table format “Allow row to break across pages.”

Friday, March 26, 2010

Keyboard Shortcut of the Week

Show/Hide Formatting Marks

Showing Formatting Marks (also called “non-printing characters”) in Word is a valuable tool in determining the method required to modify formatting or to diagnose document problems. For example, can you tell whether the text below was formatted using tabs or a table to position the text?

How would you go about correcting what appears to be irregular alignment of centered text?

While seeing formatting marks is important, I don’t like to view them all the time. It makes reading the document for content difficult, and in some cases can change how the document appears to be paginated.

When I encounter a place in my document that looks unusual and I want to check it out, I just toggle formatting marks by pressing Ctrl + * (Shift + 8), see what’s up, then toggle them back off. (Please note when using this shortcut, the asterisk on the number pad does not work.)

Thursday, March 25, 2010

So Happy Together – Part II

Avoiding Awkward Page Breaks with Keep Lines Together

The concepts in this article apply to both Word 2003 and 2007, however the steps listed are for 2007 only.

Welcome to avoiding awkward page breaks, part deux. (I love saying “part deux.” It makes me think of Jean-Claude Van Damme. I’m not sure why, but just play along.)

In last week’s post, I described how to prevent paragraphs from being broken badly using Widow/Orphan control. This week I’ll explain how the paragraph format Keep Lines Together can also be used to manage text breaking across pages, and why it doesn’t work as you might think, and sometimes not at all.

The Basics

Keep Lines Together works well with quotes or long section headings that need to be kept together on a page. For example, in the broken heading below, Widow/Orphan control won’t save you because there are enough lines in the heading to break without leaving a single line alone on a page. Keep Lines Together to the rescue!


To apply Keep Lines Together, follow these steps:

  1. Begin by selecting the paragraph(s) you want to prevent from being split.
  2. Next, open the Paragraph dialog box by clicking the dialog box launcher in the Paragraph group in Home ribbon.


  3. If necessary, select the Line and Page Breaks tab.

  4. Then, check the Keep Lines Together box.

  5. Click OK.

When it Doesn't Work

Now that you’re hip to Keep Lines Together, you might think you’re a smarty-pants and try to use it to prevent paragraphs in a table from being split between pages, as in the image below.


The joke’s on you because Word ignores this setting1 in a table! Instead, disable the table format “Allow row to break across pages” to keep the text together.

When it Doesn't Work the Way You Expect

It Ain’t Block Protect

If you’re a former WordPerfect user, I bet you’re acquainted with the Block Protect feature. By selecting a block of text and applying Block Protect in WordPerfect, you can prevent the entire defined block from being split across a page break. If you try to use Word’s Keep Lines Together feature in the same fashion, however, you’re sure to be disappointed. Read on to learn why.

In the screen shot below a signature block in a pleading is being split. Note that each line of the signature block is a separate paragraph.


In this scenario, selecting the text that should be kept together and applying Keep Lines Together has no effect! (Seriously, try it.) That’s because the Keep Lines Together works only within a paragraph, not between paragraphs. I think Microsoft should rename the Keep Lines Together feature “Keep Lines in a Paragraph Together” because that’s really what it does.

So, how do you avoid the above problem? You could use manual line breaks, but that’s messy and takes too long. Check back next week for the smartest way.

Don’t you hate cliffhangers? It’s like my blog has become a bad martial arts action flick.


1 Widow/Orphan control is also ignored in tables.

Friday, March 19, 2010

Keyboard Shortcut of the Week

Single and Double Line Spacing

Lucky you, it’s a bonus week with two keyboard shortcuts for the price of one. They go together so nicely, I couldn’t bear to split them up. This week’s shortcuts are also two of the easiest to remember because the keys closely match the function!

While there are five kinds of line spacing in Word (single, 1.5, double, at least, exactly and multiple), I most often use single and double, and like a fast way to switch back and forth between them.

To quickly apply single spacing, press Ctrl + 1. For double spacing, press Ctrl + 2. So simple. So useful.

Wednesday, March 17, 2010

So Happy Together - Part I

Cue the mood music


Avoiding Awkward Page Breaks with Widow/Orphan Control

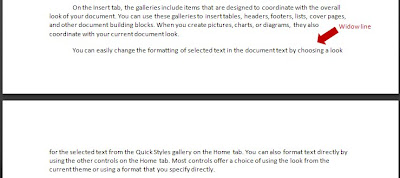
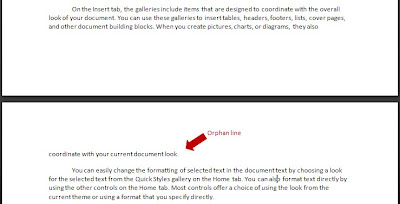
I consider a page break awkward when the lines of a paragraph are not neatly split, such as when a single line of a paragraph is left alone, or a heading is separated from the following paragraph. There are three simple ways to automatically control how paragraphs are broken across pages; the first is Widow/Orphan control. Widow lines occur when the first line of a paragraph is separated from the rest.


Orphan lines occur when the last line of a paragraph is separated from the rest.


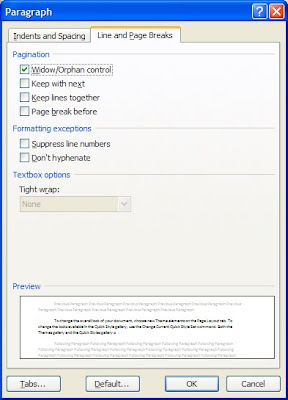
To prevent widow and orphan lines in a document, follow these steps:

  1. Begin by selecting the paragraph(s) you want to prevent from being split.
  2. Next, open the Paragraph dialog box by clicking the dialog box launcher in the Paragraph group in Home ribbon.

  3. If necessary, select the Line and Page Breaks tab.
  4. Then, check the Widow/Orphan control box.

Make it Stick

There are very few instances where it is appropriate to leave a widow or orphan line – in fact, I can’t think of any! I believe this setting should be used for every paragraph in virtually every document, so I recommend adding it to the normal template. That way it’s always applied when creating new documents. Of course, if you find a situation where you need to allow widow and orphan lines, you can always turn off the feature.

Here’s how to enable widow/orphan control for new documents:

  1. Begin by opening a new blank document.
  2. Follow steps 2-4 above.
  3. Click the Default button at the bottom of the Paragraph dialog box. A message will appear warning that you are about to change default paragraph formatting and asking if you want this change to affect all new documents based on the normal template.

  4. Click Yes.

If you use other templates and would like to enable widow/orphan control by default in them, begin by opening the template to update, then follow the procedure above.

Check back for part two of this article next week.

Friday, March 12, 2010

Keyboard Shortcut of the Week

Extend Selection - F8

Selecting text with the mouse can be frustrating, especially when you’re grabbing a large block of text that spans pages. Certain Word features can sometimes make selecting text with the mouse even more annoying. For example, the option “When selecting, automatically select entire word,” causes the selection to jump to the end of words, making it difficult to capture just a portion of a word. Word’s “Use smart paragraph selection” feature, which automatically captures the paragraph mark at the end of paragraphs, can also get in the way. The feature is helpful when your intention is to copy a paragraph’s formatting along with its text, but if all you want are the words, you’ll have cleanup to do after pasting or applying formatting to the selection.

“Keyboard freaks” like me and former WordPerfect users will appreciate the Extend Selection feature. By activating Extend Selection with F8, you can select text by using standard navigation techniques such as the arrow keys on your keyboard[1] or more complicated maneuvers such as Ctrl + Home to select from your cursor to the beginning of the document, or Ctrl + Page Down to select from the cursor to the top of the next page or next occurrence of whatever is defined by the Browse Object. When you’re finished selecting, press ESC to cancel Extend Selection (your text will remain selected).

Even more useful is the opportunity to extend the selection to a particular character. For example, say you want to select the citation in the text below to mark it for a table of authorities. If you’ve tried this using the mouse, you’ve probably found it difficult to capture just the citation and not the punctuation that follows it. Begin by positioning the insertion point at the beginning of the citation, press F8 to turn on Extend Selection, then type a right parenthesis. The selection will quickly jump to the right parenthesis at the end of the citation.

Pressing F8 twice selects the current word. Press F8 again to select the current sentence, once more to select the current paragraph, and once again to select the current section. One more time selects the entire document. If you’ve gone too far with this, just press Shift + F8 to step back a level (i.e. from selecting the paragraph to selecting the current sentence.)

[1] For this to work as expected, be sure “Smart Cursoring” is disabled.

Thursday, March 11, 2010

Trouble with Table of Authorities Categories

This one’s for my friends in legal and applies to both Word 2003 and 2007. If you are not already familiar with the table of authorities feature in Word, you can find basic tutorials here: Word 2003, Word 2007.

When creating a table of authorities in Word, watch out for changing category headings. Because of the way Word stores the names of table of authorities categories (Cases, Statutes, Rules, etc.), the category names may be different if the brief is printed from another computer.

Marking Citations

As you mark citations in a brief for inclusion in a table of authorities, you select the category for each citation. For example, if you’re marking a case, you would select “Cases” from the Category drop-down list.

In the background, Word has assigned numbers to the categories, using the order in which they appear in the Category list. For example, in the example above, Cases is category 1, Statutes is category 2 and Other Authorities is category 3.

You can see this in action when you look at the {TA} field that is inserted into the document when you mark a citation. At the end of the {TA} field in the sample below, “\c 1” indicates the citation is marked for category number 1.


Changing Category Names

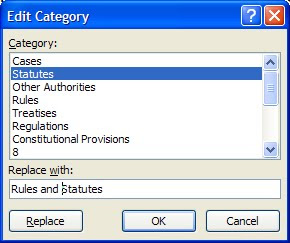
The names associated with each category name can be changed (for example, from “Statutes” to “Rules and Statutes”). To change a category name, open the Mark Citation dialog box, then click the Category button to open the Edit Category dialog box (see image below). Select the category to be renamed, then type its new name in the Replace with field. Click OK.


Inserting the Table of Authorities

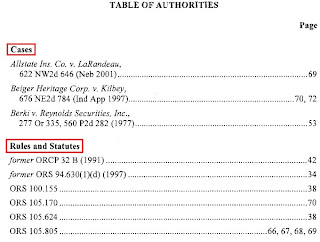
When {TOA} fields are added to the document (there will be one field for each category), the completed table of authorities is displayed with the category headings appearing automatically and the marked citations organized under the appropriate headings.

The Problem

When table of authorities category names are changed, those changes are saved to the local computer and do not travel with the document. This means that if a legal assistant creating a table of authorities renames category 2 from “Statutes” to “Statutes and Rules,” the attorney he/she supports will not see this change in the final document when opening the document on a different computer. Explain that one to a lawyer up against a filing deadline!

The Fix

If you aren’t certain you will be the only person to print a final brief with a table of authorities, you can avoid the problem of changing category names by preventing Word’s automatic addition of category headings and typing the category headings yourself.

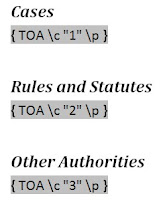
After the {TOA} fields are added to the document, display the properties of the fields either by right-clicking on the table of authorities and choosing Toggle Field Codes or by pressing Alt + F9. You will see a set of fields (one for each category) that looks similar to this:


The “\h” switch in each of the {TOA} fields above is what causes the category heading to be displayed automatically. Remove this switch from each {TOA} field and type the desired category headings. (Be sure to do this outside the field braces.) The above example should now look something like this:
Next, toggle field codes again to display the results of the fields rather than the fields themselves (Alt + F9). At this point, you’ll see both the heading you typed as well as the heading Word has added automatically. You’ll need to update the fields (F9) to see the change.

Now, because the category heading are hard-coded, it’s impossible for them to change automatically when the document is printed on another computer.

Friday, March 5, 2010

Keyboard Shortcut of the Week

Go To Previous Revision - Shift + F5

One of my favorite keyboard shortcuts is Shift + F5, Go To Previous Revision. This feature toggles among the last three revisions made.

I use this shortcut most often when I accidentally press the Page Down key when I’m going for the Delete key – a constant problem for me because I use different keyboards and they aren’t laid out the same. Rather than scrolling back through the document to find my place, I just press Shift + F5 and the insertion point jumps back to its last position. Pressing Shift + F5 again takes me to the revision I made before that one, and, using the function a third time takes me back to the revision before that.

This shortcut also works between open documents. So, even if your last edit was in another open document, the insertion point will jump right to it. I find this especially helpful when I’m copying text from one document to paste into another.

For those of you who remember this shortcut from previous version of Word, you’ll notice in Word 2007, the history of past revisions is not saved with the document as it was in Word 97. Let’s hope they bring this functionality back in the next release!

A More Helpful Merge Helper

Do you miss the old Mail Merge Helper from Word 97-2000? It was so simple! It only had three steps: create the main document, select the data source and merge them.

Starting with Word 2002 and continuing through Word 2007, it seems Microsoft decided we needed more handholding through the process, and created the Step by Step Mail Merge Wizard. They probably wanted to show off their new user interface gadget, task panes.

The new wizard has six steps instead of three. The mail merge process didn’t really change; it was just broken down a bit further, making it feel longer and more complicated.

For example, using the old Mail Merge Helper, the first step is to identify the main document by choosing the type of document, such as form letter, mailing labels, envelopes, etc. The document on the screen is assumed the main document. Using the new wizard, the first step is to choose the type of document. Step two is to choose whether to use the current document or start a new document from a template or existing document. For experienced Word users, the added detail of the wizard doesn’t feel like much of an improvement.

Now, you know I wouldn’t bring this up if I didn’t have a fix, right?

If you’re like me and would like to return to the simpler Mail Merge Helper from past versions, you can add a button to access it to the Word 2003 toolbar or Word 2007 Quick Access toolbar and forget the new wizard!

To add the Mail Merge Helper to any Word 2003 Toolbar:

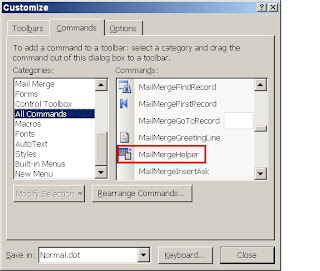
  1. Right-click on any toolbar and choose Customize from the menu.
  2. If necessary, select the Commands tab. Then choose All Commands from the Categories list.
  3. Locate MailMergeHelper in the Commands list and drag it to the desired place on the toolbar. (See image below.)
  4. Click Close.


To add the Mail Merge Helper to the Word 2007 Quick Access Toolbar:

  1. Right-click anywhere on the Quick Access Toolbar and choose Customize Quick Access Toolbar from the menu.
  2. Using the Choose commands from drop-down list, choose All Commands.
  3. Locate and select the Mail Merge Helper command from the Commands list. (See image below.)
  4. Click the Add button to add it to the Quick Access Toolbar.
  5. If necessary, adjust the position of the button on the toolbar, and then click OK.

Ahhhh… Like a pair of old, maybe not stylish, but comfortable jeans. Is new always better? In the case of both the Mail Merge Helper and my favorite jeans, my answer is no.

What’s your opinion?

Please send your Word questions to me at wordtrainingandtips@gmail.com.

Friday, February 26, 2010

Keyboard Shortcut of the Week

Change Case - Shift + F3

Changing the case of text you’ve already typed can be time consuming. For example, you may decide that a heading in your document should use “title case” instead of all uppercase. If you have quick fingers, it might seem easiest to just retype the heading in the proper case, rather than fix each word’s capitalization.

The Word 2003 and 2007 the Change Case feature is accessed with Shift + F3 and that lets you toggle among capitalization options:

· Sentence case
· Lowercase
· Uppercase
· Capitalize Each Word (called Title Case in Word 2003)

When one or more full sentences are selected, pressing Shift + F3 will toggle among Upper, Lower, and Sentence case. When a partial sentence is selected (no punctuation mark), Shift + F3 will toggle among Upper, Lower and Capitalize Each Word/Title Case.

Which of These is Not Like the Other?

This article applies to both Word 2003 and Word 2007.

Text in Word documents can look the same, but actually be formatted with different fonts, indents, paragraph spacing, etc. For example, check out the two, seemingly similar paragraphs below. (You’ll have to take my word for it, at least for now, that they are formatted differently.)

So, what’s the big deal? They still look pretty good, right? The trouble comes when you need to modify the document. Let’s say you want to add new, numbered paragraphs. Press Enter after the first paragraph, and you get a new numbered paragraph with the proper indent. But, do so after the second paragraph and you get no number and the text begins at the margin with no indent. Whaaaa?

If you were to look under the hood to view the formatting used, you’d see that the first paragraph is automatically numbered, and the font is Bell MT. The second paragraph does not use automatic numbering, and the font is Times New Roman.

If this kind of erratic behavior happens in your document, you can troubleshoot the problem and deduce what’s different between two blocks of text using the Reveal Formatting task pane. It’s difficult to access in Word 2007, so I recommend either adding it to the Quick Access Toolbar or use the keyboard shortcut: Shift + F1. In Word 2003, you may choose Reveal Formatting form the Format menu.

Here’s what the Reveal Formatting task pane looks like:

The Selected text box shows the text selected in your document or, if no text is selected, the word the insertion point is in. If the insertion point is in a blank paragraph, the box will say “Sample Text.” The Formatting of selected text area shows, by category, the formatting that is applied to the selected text. For example, in the figure above, the font size of the word “snowflakes” is 11 pt and the spacing after is 10 pt. To change any formatting, click the appropriate blue link to open the corresponding dialog box.


But wait, there’s more.

Instead of jumping back and forth in your document, viewing the task pane to see what might be different between two blocks of text, you can make Word automatically compare them, and display the differences in the Reveal Formatting task pane. First, select the first block of text to compare, check the Compare to another selection checkbox. Then select the text to which to compare it.


Here’s the Reveal Formatting task pane comparison of the sample paragraphs above:

It’s easy to see that the first paragraph uses the font Bell MT and the second uses Times New Roman, as well as other formatting differences.

Still, it gets even better.

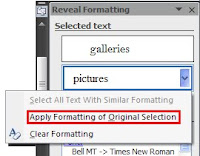
Once you’ve determined that two blocks of text are indeed different, you can quickly make them the same. Begin by hovering the mouse pointer over the second Selected text box to display the menu button. Choose Apply Formatting of Original Selection from the menu to copy the formatting from the first paragraph to the second. Now, the second block of text is formatted identically to the first.


Can you believe I’m giving this stuff away free?

Friday, February 19, 2010

Keyboard Shortcut of the Week

Pete and Repeat - F4

While editing documents, particularly when cleaning up documents created by piecing together bits of text from lots of sources, you probably find it necessary to apply the same formatting in many places throughout the document to make it consistent.

You could create a macro to apply the necessary formatting; assigning a keyboard shortcut to make the process quicker, but there’s an even easier way. Use the “Repeat last action” command with F4.

Begin by applying the formatting to repeat, such as bold, line spacing or indent. Then, navigate to the next block of text to be formatted and press F4 to apply the same formatting to the new text. Repeat the repeating as many times as you like, just be sure not to perform a new action between repeats. Otherwise, you’ll be repeating the new thing. Then you'll have to repeat the whole process.

You can capture several options at once, such as indent, line spacing and widow/orphan control, as long as you do so all in one step, using a dialog box. If you select multiple options via the Ribbon or with keyboard shortcuts, only the last option is captured to be repeated.

If you make a mistake and repeat the last action in the wrong place, just press F4 again to reverse the action. You can also use Undo (Ctrl + Z) without making that “last action” the one that is repeated.

More fun with repeat.

Thursday, February 18, 2010

Why I Hate the Mini Toolbar

The Mini Toolbar is part of the Microsoft Office 2007 Fluent User Interface. It appears automatically in Word whenever you select text and provides access to common text editing features such as font size, bold and indent.

The concept is that, by placing commands near the mouse pointer, they are easier to access. Great idea in theory. In real life, it’s a pain, at least in this instance.

I have a couple of issues with the Mini Toolbar. First, it’s in the way. I like to select text as I’m reading. It helps me read fast and keeps me from losing my place if I am interrupted. Kind of like when you read a book and use your finger to skim down a page, but without getting chocolate on the monitor. The trouble is that when I do this, the Mini Toolbar appears and blocks what I’m trying to read. Ditto when I want to drag a block of text to another location in my document. Grrrr.

Second, the commands available on the Mini Toolbar are, to me, an odd collection. For example Underline is missing. Don’t we apply Underline at least as much as Italics? I almost never use Highlight, and why is it necessary to have the Font Size command and the Grow and Shrink Font buttons?

Luckily, Microsoft anticipated my irritation and provided a quick and simple way to disable the Mini Toolbar's annoying automatic appearance. Here’s how:
  1. Click the Office button and select Word Options.

  2. If necessary, select the Popular category from the left-hand pane.

  3. Uncheck the “Show Mini Toolbar on selection” option, then click OK.

After making this change, the Mini Toolbar is not dead, just sleeping. You can awaken it whenever you like by alternate-clicking anywhere in your document. (This is how the feature works in Outlook, Excel, PowerPoint.)

Wednesday, February 17, 2010

Whose Idea Was the Ribbon?

Office 2007 has been out for some time now, and most of us have gotten used to the Ribbon, but do you know where the it came from? Why did Microsoft abandon the system of menus and toolbars they had used for so long? Who decided that some command buttons on the Ribbon should be larger than others or in what order they should appear? Why did headers and footers move from the View menu?

Whether you love or hate the Ribbon as part of Microsoft’s Fluent User Interface, the story about how it came to be is quite interesting.

The Problem

The interface Microsoft had been using from the start had become impossible. When Word 1.0 shipped in 1989 with only two toolbars and five items on the Format menu, the user interface worked rather well.


As later versions were released with all their added features, the user interface became much too complex to navigate efficiently. By the time Word 2003 was released, it had morphed into a bloated monster with 31 toolbars and 19 task panes (a new user interface component introduced in Word 2000) and menus that extended more than half the length of the screen.


Unless you’d been a Word user from the beginning and learned the new features as they were introduced, the task of trying to figure out how to get work done with Word was daunting, to say the least. (Raise your hand if you are a former WordPerfect user who lived through a migration to Word. Ug. That hurt.)

Microsoft Gets a Clue

Microsoft began to realize that their problem was not only usability, but user emotions. After reviewing over 10,000 hours of video of people using Office to find out how people felt when they used it, developers learned that users had lost their “sense of mastery.” A sense of mastery is a feeling that you know what a program is capable of. It’s feeling competent that even if you don’t know every feature, you could figure it out. People didn’t know where to look for features because there were too many places to search. Is it on a toolbar, buried on the third level of some menu, in a task pane, etc.? There was no way to know except trial and error. So, Microsoft tried to make people happier using Office by making it better.

Working Toward a Solution
The first step to a better understanding of how to solve the problem of the now unworkable user interface, was the creation of the Customer Experience Improvement Program. This program gathered data about how people really used applications, not how developers thought they should use them. Through the CEIP, Microsoft collected over 3 billion sessions of data from Office users while they worked and used this data to redesign the user interface.

When I first began exploring Word 2007, I was delighted to find that headers and footers were moved from the View menu to the Insert tab on the Ribbon. After researching the design of the Office 2007 interface, I learned headers and footers could have easily ended up on the Page Layout tab. It turns out that 50% of testers thought headers and footers were something to insert and the other half thought they were a page property.

After going through several prototypes for the new user interface and settling on the Ribbon concept, Microsoft also did research to determine how the 1,000+ commands should be grouped and where they should appear. They used their CEIP data to analyze how people use things together and in what order, and then grouped those commands together on a tab. Developers learned that the most commonly used feature of Word, Excel and PowerPoint was Paste. No wonder it’s the very first button on the Ribbon!

Another factor in the user interface was deciding how large to make the command buttons. Fitt’s law is a model of human movement which says: The farther away a target is, the longer it takes to acquire it with the mouse, and the smaller a target is, the longer it takes to acquire it with the mouse. For example, a large button far from the cursor is easy to hit. Just toss your mouse pointer in the general direction and you’ve got it. By the same token, a scooch is all you need to select a small button near the mouse pointer.

You can see this in action when you look at the Page Layout tab and notice that the Margins command button is large while the Orientation and Size command buttons are small. Most people change margins more often than paper size or orientation. I’m a bit mystified, though, about why the Themes command button is large and appears first on the Page Layout tab. Who uses Themes that frequently? Maybe Microsoft just wanted us to think the feature was of high value. “Gee, if it’s important enough to be the first button, maybe I’m a loser if I don’t use it?”

Did They Get It Right?

So, after years of research, user feedback, and development, we ended up with the Ribbon. I think it's a step in the right direction, but I think it could stand some improvement. I'm used to it now, but I still get frustrated. For example, it bugs me that I have to click in a table before I can see the Design and Layout tabs. Even though I need to be in a table to use the commands on these tabs, for some reason I want to see them before I decide to use one.

If you’ve got 90 minutes to kill and would like to hear the whole story about how the Ribbon was developed, including seeing some fun screenshots of past versions, prototypes and testing data (the eye-tracking simulation is hysterical), check out the 2008 MIX conference presentation by Jensen Harris, Group Program Manager of the Microsoft Office User Experience Team. It’s pretty entertaining.

Oh, by the way, did you know Word 2010 will be released soon? It still has a Ribbon, but at least in the beta, the Office button (a.k.a. “Office Pizza”) is gone. Yay!

If you have comments about this article, I'd love to hear from you. Please also send your Word questions to me at wordtrainingandtips@gmail.com.