Thursday, April 22, 2010

Wavy Blue Lines

You may be seeing wavy blue lines in your Word documents and wondering, “what’s up?” The answer is, “it depends.” That’s because Microsoft uses a wavy blue line to identify two different document issues. Weird, eh? It’s like a car manufacturer using the same light on the dashboard of your car to mean either the trunk is ajar, or you’re almost out of gas. Both could be trouble, but the latter might be a bit more dire, depending on how far you are from home.

Formatting Consistency Checker

The Formatting Consistency Checker was introduced in Word 2002 and helps you maintain a uniform layout of your document by alerting you when formatting in a document is similar to, but not exactly the same as other locations in the document. Word looks for these potential areas of irregularity:
  • Directly applied formatting
  • Bulleted and numbered lists
  • Directly applied formatting that matches a style
For example if you typed a section heading and manually applied Arial 14pt and Bold, but a style exists in the document with the same attributes, the directly formatted heading would appear with a wavy blue underline. Upon right-clicking the underlined text, an option on the shortcut menu would read, “replace direct formatting with style.”

I’m not a big fan of this feature. Sure, it’s a good thing to format your documents consistently, and in a perfect world, we would all have the time to make sure everything is done “right” under the hood. The bottom line, however, usually comes down to how the document looks on the surface when printed. Additionally, using the Formatting Consistency Checker requires enabling the Keep Track of Formatting option, which has a whole pile of ramifications too numerous to detail here.

If you’d like to play with the Formatting Consistency Checker to see how you like it, follow these steps to enable it:
  1. Click the Office Button and choose Word Options.
  2. Select the Advanced category and, in the Editing options section, select the Keep track of formatting checkbox.
  3. Select the Mark formatting inconsistencies checkbox.
  4. Click OK.
Contextual Spelling

The other cause of wavy blue lines in Word documents is Contextual Spelling, a new function in Office 2007. This is one of my favorite improvements in Office! Just like the familiar red wavy underline that highlights words that are incorrectly spelled, the blue wavy underline highlights words that are incorrectly used. For example, the sentences below are spelled correctly and sound right when you speak them, but the wrong word is being used.


To enable Contextual Spelling:
  1. Click the Office Button and choose Word Options.
  2. Select the Proofing category and, in the When correcting spelling in Microsoft Office programs section, select the Use contextual spelling checkbox.
  3. Click OK.
My favorite Wavy.

Friday, April 16, 2010

Keyboard Shortcut of the Week

Insert a Page Number Field

One of the most common reasons for creating a header or footer in a document is to add page numbering. Word 2007 offers all kinds of fancy page numbering options, but most of the time, all I want is a plain old number. To add one quickly, position the insertion point where the number should appear and press Alt + Shift + P to insert a page number field.

If that’s too easy for you, check this out for a harder page number trick.

Thursday, April 15, 2010

Save a Tree

It seems you can’t swing a chain saw in Oregon without hitting someone urging you to be “green.” And really, why wouldn’t you want to save the planet? I’m pretty sure it’s kind of important to… everyone. It’s just all the nagging that starts to grate on me. If you’re feeling the pressure too, here’s an easy way to use Word to get the eco-nuts off your back.

Print Only What You Need

Current Page
A large contract you prepared yesterday is ready to be signed; however, you notice there’s a problem with the date on the signature page. No need to re-print the entire contract. Word allows you to print just the page your insertion point is on. Begin by placing the insertion point on the page you want to print. Then, open the Print dialog box and select the Current page option in the Print Range section, then click OK.


Certain Pages
If your contract needs to be further modified before signing, you can print just the changed pages. Printing only certain pages is simple, especially if you don’t have multiple sections in your document. (What’s a section?) In fact, there are instructions right on the dialog box! To print pages three through seven, just type 3-7 in the Pages field. To print pages one, five, and nine through 12, type 1,5,9-12.

If your contract has more than one section, you may need to specify both the page and the section to print. If you specify only the page, Word will print that page number (if it exists ) from the first section of the document. To identify which page of which section you want to print, enter criteria in the Pages field like this:

Page five, section three: p5s3
Pages 10-15, section one: p10s1-p15s1

Selection
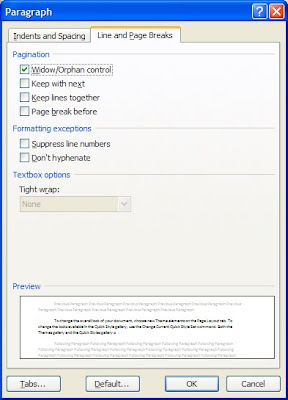
If you want to see how just a portion of your text looks, you can print only selected text. Begin by identifying what you want to print by selecting it. Then click the Selection radio button in the Print Range section of the Print dialog box. Note: The selected text will print starting at the top of a new sheet of paper, so it’s not the best choice if you want to review your document’s layout or the position of elements on the page.

Use Both Sides of the Paper

Print Duplex
Many printers have a duplexing option that automatically prints on both sides of the paper. To find out if yours does, check the manual (Wha? I know. I crack myself up!) or just click the Properties button on the Print dialog box and look for double-sided or duplex options.

Even if your printer doesn’t support double-sided printing, you can still save paper using Manual Duplex. This process prints all of one side of the pages, then you flip the stack over and print the other side.

To enable it, check the Manual duplex box on the Print dialog box. After the first side of the pages have printed, a prompt will appear to let you know it’s time to flip the pages over and place them back in the printer’s paper tray (see below). When you click OK, the remaining pages will print.


No Duplex? No Problem.
If you don’t see a Manual Duplex option on the Print dialog box, you can fake it by first printing all of the odd pages, turning the pages over, then printing all of the even pages. To print just odd pages, choose Odd from the Print drop-down list. Then, flip the stack over, load the pages into the printer’s paper tray, and then choose Even from the Print drop-down list to print the even pages.

Print Multiple Pages Per Sheet
Another way to save paper is to print multiple pages on one sheet of paper. It’s not the best choice for optimum readability, but I really like the option for taking documents to proofread at home or on the train. To print up to 16 pages on the same sheet of paper, select the number of pages to print from the Pages per sheet drop-down in the Zoom section of the Print dialog box.

If your printer has duplex capability, you can combine duplexing and printing multiple pages per sheet to get a minimum of four pages per sheet of paper! Unfortunately, you can’t use the Manual Duplex option with Multiple Pages Per Sheet.

I hope you’re feeling a bit more self-righteous now that you have another set of tools for reducing your impact on the planet’s resources. Enjoy that smug feeling, you've earned it.  Now I have to go sort the recycling bin.  It's trash pickup day on my street.

Friday, April 9, 2010

Keyboard Shortcut of the Week

Switching Between Open Documents

I usually have three or four Word documents going at the same time. I like to have my Inbox and Calendar in separate windows, and I often have three or more emails open at once. Throw in iTunes and a couple instances of Internet Explorer, and it can be hard to handle. Some people call it scattered, or even ADD, but I call it multi-tasking! Isn’t that what Windows is all about?

I bet you know the Windows keyboard shortcut Alt + Tab to cycle through open windows. It’s a great timesaver, but with a dozen or more windows to deal with, your left hand is bound to cramp up by the time you get to the window you need.

Did you know you can cycle through just your Word documents? Press Ctrl + F6 to move forward through your documents or Ctrl + Shift + F6 to move in the reverse direction.

If you have a favorite keyboard shortcut, email me and I’ll share it with the world (or the five people who read this blog).

Thursday, April 8, 2010

Review of Formatting Marks, a.k.a Nonprinting Characters

A recent Keyboard Shortcut of the Week detailed how to easily toggle Formatting Marks. Now that you can easily see them, what do they mean? Some symbols are easy to figure out. For example, ¶ indicates the end of a paragraph. But some are just plain weird. For example, what could ¬ possibly mean?

Here is a summary of the more common formatting marks you’ll encounter in Word, what they represent, and how understanding them can help you troubleshoot formatting problems.


Space - Depending on the font or justification you’re using, it may be difficult to tell where there are extra spaces in your document. If words seem too far apart or sentences too close together, check for the correct number of dots.


Non-breaking Space (also called Required Space) - Great for preventing dates or names from being split by line breaks.


End of Paragraph - Appears when you press the Enter key. It’s helpful to be able to see end of paragraph marks when lines appear to end before the margin, or don’t wrap as you expect. The absence of this symbol where space exists between paragraphs is an indication of spacing before/after formatting. The End of Paragraph formatting mark holds the formatting for the paragraph, such as tabs, indent, or line spacing. If you want to copy the text of a paragraph including its formatting, select the end of paragraph mark along with the text.


Soft Return or Line Break - Just like the End of Paragraph mark, look for these when lines appear to end before the margin or don’t wrap as you expect. They often show up in your document when pasting from Web pages.


Line and Page Break Formatting Mark.  Appears in the left margin on the first line of any paragraph with the following:
  • Keep with next
  • Keep lines together
  • Page break before
  • Suppress line numbers
If you find large blank spaces in your document, look for this symbol as a clue.
Tip: Double click the symbol to open the Paragraph Format dialog box.


Tab - Helpful to see where tabs are inserted to move text away from the left margin versus where the a left indent is applied.


Image Anchor - Appears to the left of the first line of a paragraph to which a image is anchored. Since anchored image move with the paragraph to which they’re anchored, be careful when moving or deleting a paragraph with this symbol.


Page Break - Indicates a manual or “hard” page break versus one that occurs naturally.


Section Break - Header and footer or other page formatting not consistent? Check for section breaks.


Column Break - Indicates a manual or “hard” column break versus one that would occur naturally.


Conditional Hyphen - Conditional hyphens are automatically added to your document when the Hyphenation feature is set to automatic. This feature is useful if you like to use Full Justification.


End of Cell/Row Marker - Like a paragraph mark, but indicates the end of a table cell or row. Copying the contents of a cell or row that includes the end of cell/row mark, includes the cell’s/row’s formatting.


Hidden Text - A dotted underline indicates hidden text. Because hidden text doesn’t normally print, it can be used to temporarily remove text from a document without deleting it. Some Word fields (Index, Table of Contents and Table of Authorities) have the hidden attribute applied automatically.


Field Codes - Fields codes are instructions that tell Word to display information such as page numbers, dates, hyperlinks and other information in a document. Field codes appear between curly brackets and are made up of the field name, properties or variables, and sometimes switches that are used to customize the field.

Always On
You may find there are certain formatting marks that you always want to see. For example, I use a lot of images in the documents I create. I like to see object anchor all the time to keep from accidentally deleting an image along with a paragraph I no longer want.

To select Formatting Marks to always display:

  1. Click the Office Button and choose Word Options.
  2. Select the Display category and scroll to the Always show these formatting marks on the screen section.
  3. Check the box(es) for the formatting mark(s) you want to see.
  4. Click OK.

Friday, April 2, 2010

Keyboard Shortcut of the Week

Zoom Zoom

I’ve had a terrible cold this week, so I’m dreaming of a keyboard shortcut that pops up a Kleenex, or fires a cough drop out of the CD drive. But, since Word does not have any cold and flu care features, I guess I’m stuck doing those things the old fashioned way. Snif.

You may argue with me that this is not exactly a keyboard shortcut because it involves the mouse, but I use it 100 times a day, so I think it’s worth sharing.

Both Word 2003 and 2007 have a Zoom feature that lets you magnify or shrink the display of your document on screen. Zooming way out is great when you need a bird’s-eye view of the layout of your document. Zooming in really helps to focus on your text and makes proofreading easier. It’s also a lifesaver when you forget your glasses!

More information about using Zoom in Word 2003 and Word 2007.

If you have a mouse with a wheel button, you can use it to zoom in or out on your document by pressing the Ctrl key while you roll the wheel. This works in all document views, including Print Preview.1

At first I had a hard time remembering which way to roll the mouse to zoom in or out. Here’s a trick to help you with this: roll the wheel toward what you want to see closer and away from what you want to see from farther away.

1 Try this in other Microsoft Office programs and Internet Explorer.

Thursday, April 1, 2010

So Happy Together – Part III

Avoiding Awkward Page Breaks with Keep With Next

The concepts in this article apply to both Word 2003 and 2007, however the steps listed are for 2007 only.

This is the third article in a three-part series describing tools to prevent paragraphs from being split poorly across a page break.

Last week I was mean, and left you hanging without giving you the answer to the problem of signature blocks that are broken across a page break. In the situation pictured below, neither Widow/Orphan control nor Keep Lines Together will prevent the signature block from being split. The best solution is to use Keep With Next.


Unlike Keep Lines Together, Keep With Next does what it sounds like it should. It keeps a paragraph with the one that follows. This works great with headings that should always be kept with the paragraph that follows them and, of course, anytime you want to keep two paragraphs together as in a signature block.

To apply Keep With Next, follow these steps:
  1. Begin by selecting the paragraph(s) you want to prevent from being split from the one(s) that follow.

  2. Next, open the Paragraph dialog box by clicking the dialog box launcher in the Paragraph group in Home ribbon.


  3. If necessary, select the Line and Page Breaks tab.

  4. Then, check the Keep With Next box.

  5. Click OK.
I think of Keep With Next as a chaining feature. By applying it to several paragraphs in a row, you can “chain” them so they are never separated. Just be careful you don’t try to keep more together than can fit on a single page or you’ll experience weirdness.

And remember, just like Widow/Orphan control and Keep Lines Together, Keep with Next doesn’t work in a table. To keep paragraphs in a table together,
disable the table format “Allow row to break across pages.”